Tuesday, August 6, 2013

Sweet potato? Yam? I'm confused.

Hi Tartlets!

I was inspired to write this just now, as I read a recipe called "African Kale & Yam Soup".  I'm not sure if this person really used yams or sweet potatoes - nonetheless, I'd like to discuss these two confusing tubers.  (PS - I am SUPER excited to try this recipe and I'm told it's delicious!)

Yams are not sweet potatoes, or vice versa.  I'm sorry if this throws your entire life's calling of sweet potatoes a yam.  However, I do apologize.  You quite possibly have never actually eaten a yam in your life; yams are hard to come by!

So why the mix-up?  Please read on about the science and the history of yams and sweet potatoes.

Sweet potato on the left; yam on the right.
http://www.loc.gov/rr/scitech/mysteries/sweetpotato.html
Yams and sweet potatoes are both tubers, but they are not botanically related.  Yams are closely related to lilies and grasses, and are monocots, which is a plant that has one embryonic seed leaf.  Yams are tubers of a tropical vine, Dioscorea batatas, and native to Asia and Africa.  Yams vary in size - some are the size of a small potato.  One yam was reported to have weighed 130 pounds!  Yams are grown in tropical climates such as Africa, the Caribbean and South America. Yams are starchier and drier than sweet potatoes.

Sweet Potatoes are dicots - plants having two embryonic seed leaves - and are part of the Convolvulaceae or Morning Glory family.  Sweet potatoes are often mistakenly called "yams".  The skin color ranges from white, yellow, red, purple to brown. The flesh also ranges in color from white to yellow, orange, or orange-red.  Sweet potato varieties are classified as either ‘firm’ or ‘soft’.  It is the ‘soft’ varieties that are often labeled as yams in the United States.

Origin of this mix-up?
In the US, firm varieties of sweet potatoes were produced before soft varieties.  When soft varieties began to be commercially grown, there was a need to differentiate between the two.  African slaves called the ‘soft’ sweet potatoes ‘yams’ because they resembled the yams in Africa.  Thus, ‘soft’ sweet potatoes were referred to as ‘yams’ to distinguish them from the ‘firm’ varieties.

Today the U.S. Department of Agriculture requires labels with the term ‘yam’ to be accompanied by the term ‘sweet potato.’  Unless you specifically seek out yams (which are typically found in international supermarkets), you are probably eating a sweet potato!

Both yams and sweet potatoes are very good sources of fiber, Vitamin B6, potassium, manganese, and both have 2 g protein per 1 cup (raw, cubed).  Sweet potatoes are Vitamin A rockstars, boasting 377% of daily recommended intake in just 1 cup.  Yams are an excellent source of Vitamin C, accounting for 43% of daily recommended intake.

Cook one or both of these up this week, and enjoy your dinner!


Tuesday, July 16, 2013

Fool your kids (or Sig-O): Pureed Cauliflower (Vegan option/GF)

Hello Tartlets!  I love making Pureed Cauliflower as a side dish instead of potatoes.  As I wrote here, cauliflower is so good for you.  Buying fresh, organic cauliflower at your local farmer's market is ideal.

The great part about this side dish:

  1. You can fool your kids, significant other, or friends into thinking for more than just a few seconds that they *might* just be eating mashed potatoes!
  2. Using an immersion blender is ideal for fluffiness of this dish. If you have kitchen helpers that like power tools (in my case, my bf), it doubles as a kitchen power tool - and he usually jumps at the chance to use it!
  3. Easy to vegan-ize.
  4. Quick and easy.  So yummy.

Ingredients

1 head cauliflower, cut into florets (don't forget to save the bit-lets!)
3 Tbsp butter or Earth Balance
1/3 - 1/2 C Parmesan or Vegan Parmesan
Salt & Pepper to taste

1. Cut cauliflower into florets.  Wash thoroughly.
Short-cut: purchase pre-washed, pre-cut cauliflower at grocery store.
Tip: Use a salad spinner to wash cauliflower.  It makes multiple washes easy - simply lift basket, dump water (or water your plants - I hate being wasteful!), then wash again.

2. Place cauliflower florets into large pot of salted water.  Depending on the size of the pot, add 1 - 2 tsp salt.  If you're not sure, start with 1 tsp; you can always add more salt later (but you can't remove once added).

3. Turn burner onto high heat; once water boils, cook cauliflower ~10-15 minutes, or until florets are tender.  I pierce with a fork or taste to ensure they're soft.  You want them soft so they puree nicely. 

4. Once cauliflower is cooked, remove from heat.  Use a colander to drain water.  Drain thoroughly.  Then place into large bowl.

5. Add butter/Earth Balance and Parmesan.  Blend with immersion blender until all florets are pureed and look like fluffy mashed potatoes.  You can also use potato masher and some elbow grease.

Taste; if too bland, consider adding a bit more Earth Balance or Parmesan (Parmesan is salty so I usually start with this).  If still too bland, sprinkle kosher or sea salt to taste.  Adjust to your tastes.  Top with freshly ground pepper.


I didn't set the photo up well (didn't intend to post), but here is last night's vegan (and almost-but-not-quite!) gluten-free dinner.  Let's call is a low-gluten dinner: Sauteed beet greens, pureed cauliflower, Gardein "Chick'n" Piccata.  It was delicious!

It's a Great Morning! Coconut Blueberry Banana Smoothie (Vegan/GF)

Smoothie ingredients, pre-blender.
Good morning Tart-lets!  What better way to start your day than to make a delicious smoothie.  Smoothies are fun, as you can make a new creation each morning!  Here is the smoothie I made this morning.  

Please note: I made a couple caloric splurges, namely the shredded coconut.  If you are counting calories, you can eliminate the coconut, agave and possibly hemp. You could try a different protein powder; hemp is caloric but I added it for its protein content.


Trim Tart Tip: Don't forget to pack floss if you're eating this en route to work!

Tip #2: Keep individually frozen banana halves in your freezer, wrapped in saran wrap.


Coconut Blueberry Banana Smoothie
3/4 C organic raw kale (25 cal)
1/2 C coconut water (23 cal)
2 Tbsp Organic Hemp powder (65 cal)
1 Tbsp Organic agave (60 cal)
1/2 small banana (50 cal)
2 Tbsp organic unsweetened shredded coconut (186 cal)
1/2 C organic blueberries (42 cal)

Calories: 451

Check out these stats!
Carbohydrates: 64 g
Protein: 9.5 g
Fat: 19 g (18 g from shredded coconut; 16 g saturated)

42% DV daily potassium; ~700% DV Vitamin K; High in Vitamin C, folate, calcium, phosphorus

Monday, July 15, 2013

Cauliflower Bit-lets

If you're like me, you love cauliflower!  And, if you're a lot like me, cutting cauliflower stresses you out a little bit.  As you cut this wonderful vegetable into florets, there is always a lot of little cauli-bits all over the place that simply don't have a place in your meal and are wasted.
What to do?

Usually I toss them.

Until my Italian-immigrant-roots brain kicked in.  Why not be a Smart Tart and freeze the bit-lets and make them into something larger?

So, after each head of cauliflower is cut in my kitchen, I add more and more of the bit-lets to the growing bag in my freezer.  Use the bits in stir-frys, home-made soup stocks, sauces, mixed into a different veggie plate to add color.  Or maybe get creative and mix them into hummus or black bean dip to create a textured dip with baby cauliflower bit-lets?  

The possibilities are endless.  Use your imagination!  Now, here are some nutrition facts about cauliflower.  It boasts some great stats!  And I will post my recipe for Pureed Cauliflower [coming soon].

1 cup (100g) - raw cauliflower:
25 calories
0 g fat
0 g cholesterol
30 mg sodium
Total carbohydrates 5 g
      Dietary fiber 3 g
Protein 2 g

Vitamins/Minerals
Amounts Per Selected Serving (% DV)
Vitamin C - 46.4 mg (77%)
Vitamin K -16.0 mcg (20%)
Vitamin B6 - 0.2 mg (11%)
Folate - 57.0 mcg (14%)
Calcium - 22.0 mg (2%)
Iron - 0.4 mg (2%)
Potassium - 303 mg (9%)
Manganese - 0.2 mg (8%)


Monday, July 8, 2013

TTT: Fab 5 Products for Endurance Athletes

Hello Tartlets! 

As I was riding my bike last week on a glorious Southern Californian day and loving my nutrition of choice, I thought I would give you my Fab 5 list of products that I like to train with for triathlon and marathons.  I'll explain why I like these products from a preference and formulation standpoint.


1. PowerGel (by PowerBar)
In my opinion, hands-down the best gel on the market.  They are thin (not thick and goopy like some brands you might be familiar with), have 4-5x the amount of sodium compared to every other gel I've seen (~200 mg), and they taste good.  I like vanilla for the run (no caffeine).  I can do Double Latte on the bike (caffeinated).  I'm intrigued by the new Orange Dream flavor.  And YES, PowerBar... I am still crying over the loss of the Caramel flavor, 4 years after its discontinuation.  Please bring it back!


2. Infinit Nutrition (Custom Formulation) / Hammer Nutrition (Sustained Energy or Perpeteum)
All my nutrition for a 4 hour bike ride.
I blogged and gave you vague information on my experiment of n=1 on June 5.  I have not yet raced with my Infinit custom formulation and I will let you know after I race Ironman Calgary 70.3 on July 28, 2013 whether this nutrition worked for me in a race situation.  So far, I can say that I love, love, LOVE racing with only liquid nutrition.  I no longer worry about gels, bars, what fits into your pockets or Bento box and what doesn't, ripping open a wrapper without getting distracted while on the bike, fumbling in pockets, Special Needs nonsense, littering the race course or roads, etc.  How about 3 bottles and a Ziploc of 330 calories?  Genius.

Personally, I absolutely need protein nutrition during prolonged exercise - carbs alone simply does not work.  After 1.5-2 hours of endurance exercise, protein should be incorporated into your nutrition plan (I'll talk more about this later).  Now the question about protein type - which to use?  The jury is out, but it appears that soy protein during exercise may be the better suited protein.  Whey is superior for recovery.  Infinit recommends whey, but I ordered both whey and soy formulations.  I am currently on my soy protein formulation and that is what I will race with in Calgary.  Soy has less potential to form ammonia which leads to muscle fatigue.  It also mops up free radicals, has great acid buffering capabilities, and has a large number of branched-chain amino acids, making it easily converted to energy.  There are more benefits to soy, but this is the short list.

Before I order more Infinit, I'm going to try Hammer's Perpeteum or Sustained Energy (I'm still deciding which is best for me).  They use non-GMO (genetically modified organism) soy.  This is HUGE in my book.  I avoid GMO products at all costs.  I'll get back to you as I work out my nutrition this year.  I had a very difficult time eating on the bike during Ironman Arizona last year, so liquid nutrition is my solution.  Now I have to narrow down the best Trim Tart product.  Would anyone like to weigh in here?  Please give me your feedback/suggestions!


Margarita3. CLIF - Shot Bloks
For my shorter rides, I do love me a CLIF Shot Blok.  The Margarita flavor is my favorite; you either love it, or think I'm disgusting.  All other flavors are pretty delicious, too.  For the milder palate, the Black Cherry, Cran-Razz, Citrus and Orange are great options!

CLIF Bar and Company is an inspirational enterprise, focused on organic ingredients and sustainable business practices.  The majority of their ingredients are organic, and they use non-GMO products.  Philosophically, I am very happy to support CLIF and will go out of my way to do so.


4. Bonk Breaker and CLIF Mojo Bars
FigHoney Roasted PeanutI have a strong dislike of most bars.  As I mentioned here last month, I would much prefer a savory buffet on long bike rides (unfortunately, this is impractical for the endurance athlete.)  It is here that you and I can blame my mother.  She was always cooking and baking so I grew up on real food, all the time, and never anything overly sweet.  Never a bar to be found in our house.  I find many bars far too sweet, strangely textured, and the flavors wear on my tastebuds very quickly.  However, there are a couple bars on the market that I do like.  CLIF makes a great Mojo Bar, and Bonk Breaker bars are also excellent on long bike rides.  Flavors are good; Bonk Breakers are gluten- and dairy-free.  My favs: Bonk Breaker Fig, PB&J - for the bike.  CLIF MOJO - can't decide!  I like them all.  Mojos are great as a snack or after exercise.


5. PowerBar Ironman Recovery
I like Ironman Recovery after a hard 6-hour bike ride.  It contains a blend of maltodextrin, dextrose and fructose, with whey protein that's great for recovery.  It would be nice if this drink included additional sources of amino acids to aid in muscle recovery, but this drink works well from a user perspective, - I like the flavor and it satiates the crazed hunger I feel after long Ironman-effort bike rides during training.  Whatever recovery drink you choose, look for a 4:1 or 3:1 carbohydrate: protein ratio.


Here's another notable recovery drink - plain, old chocolate milk.  Admittedly, I don't drink cow's milk any more but this natural source of proteins mixed with simple sugars in the chocolate make recovery as simple and delicious as when you were a kid.  Whey is optimal for short- to medium-term muscle recovery, while casein has delayed protein absorption into damaged muscles as they repair over the course of a day and overnight.  If you drink milk, this really is nature's recovery drink.

What else, Tartlets?  Post on your favs, or email me at info@thetrimtart.com!

Wednesday, July 3, 2013

Quick! Afternoon snack needed STAT!

I was in need of a mid-morning, filling, low-calorie snack today.  This also works so well in the afternoon, around that 3 PM lull.


Quick Yogurt Pick-Me-Up

Ingredients
  • 1/2 Cup any Yogurt (Greek/almond/coconut/soy)
  • 1/4 C fruit (organic strawberries and blueberries are absolutely GLORIOUS this week)
  • 1 Tbsp honey, agave, Stevia to sweeten (if desired)
  • 0.5 - 1.5 tsp nuts and seeds (pumpkin, sesame, walnuts, etc)
This quick power snack will range from 90-190 calories depending on what you choose for the amounts listed above.  This is a great pick-me-up with a combination of simple carbohydrates, protein, and fats.  Pumpkin seeds offer Vitamin A, Calcium, Iron. Sesame seeds offer Vitamin A, folate, niacin.  Walnuts, Mother Nature's Little Secret (and my favorite nut, hands-down!), boast high protein, Vitamins A, C, E, K, B6, niacin, choline and are very high in folate.

Opinion: I prefer staying away from flavored or "pre-fruited" yogurts.  They're usually loaded with extra and totally unnecessary preservatives, color additives, sugar and other random ingredients.  Just do me a flavor (and a favor!) and buy plain.  Add you own goodness.


Calorie breakdown (based on above quantities)
  • Greek yogurt = 65 cals
  • Coconut yogurt = 104 cals
  • pumpkin seeds = 12.5 cals
  • sesame seeds (1/2 tsp) = 13 cals
  • honey/agave = 60 cals
  • Stevia = 0 cals
  • strawberries = 12.5 cals
  • raspberries, blackberries, peaches = 15-16 cals

Tuesday, July 2, 2013

Mango Guacamole (another 4th of July candidate!) - Vegan/GF


The Trim Tart loves guacamole, and any small twist on the regular is fun.  This mango guacamole is easy to make, delicious and healthy.  You can get creative by reserving the shells of the avocados and mango and using them for a beautiful presentation.


Mango Guacamole
Prep Time: 0 hr 25 min | Cook Time: 0 hr 0 min | Makes: 6 servings

Ingredients:

  • 3 avocados
  • 1 mango, chopped
  • 1/3 cup red onion, finely chopped
  • 1/2 cup cilantro (or chives, or mixture), chopped
  • 1/2 jalapeño pepper (more if you can take the heat!), seeded and finely chopped
  • 1 lime, seeded and finely chopped lime (2 if you like citrus flavors to be more dominant)
  • Salt & Pepper to taste


Directions:

1. Cut avocados in half; remove pit. Scoop out avocado, saving shells. Place in a medium-sized bowl.

2. Cut mango, also keeping shells.  See here for Mango Cutting 101 instructions!


 3. Chop all other ingredients and toss into bowl. Mix together with fork until blended.


Monday, July 1, 2013

Curried Rice Salad (Vegan/GF) - Perfect 4th of July side dish

I had forgotten about this recipe until this weekend when it was a potluck birthday party extravaganza with my boyfriend's family.  How could I forget this delectable, easy, healthy salad?  It's cool and refreshing - the perfect side dish for your 4th of July parties, or any time this summer.

I used everything fresh and organic and wow!  Was it ever a hit.

Curried Rice Salad
2 Tbsp coconut oil
1 medium onion, finely choppped
1/2 tsp fresh ginger, finely chopped
1 Tbsp curry powder
1 C rice (dry)
2 C water
1 tsp salt
1 C unsweetened, shredded coconut
2 ribs celery, chopped
1 medium red pepper, chopped
3/4 C raisins
1 Granny Smith apple, cored and chopped
1 C black or red grapes

Vinaigrette
1/2 C red wine vinegar
1 Tbsp garlic, minced
1 Tbsp lemon juice
1 Tbsp honey
1 Tbsp Dijon mustard
1/4 C + 2 Tbsp extra virgin olive oil
pinch of salt
2 tsp ground pepper

Garnish
1/4 C Thai sweet or Genovese basil, chopped or ribboned

Tuesday, June 18, 2013

Peach Cobbler (Vegan/Gluten-free)

I could not resist the organic peaches at the Farmer's Market on Sunday!  This is a bit of a re-do from the Easy Strawberry Granola Tart.  Today I made an organic Peach Cobbler.  I assembled it in a flash!

Peaches are so good for you!  Only 64 calories in 1 cup raw peach slices.  They are packed with Vitamin A, C, E, K, B3 (niacin), folate, calcium, magnesium, iron, and a lot potassium (8% DV).  One peach has about 2.5 g fiber, 16 g carbohydrates and 1.5 g protein.  And eat the skin!  It's good for you.

FUN FACT: Peaches and nectarines are the same species - did you know that a nectarine's smooth skin is due to a recessive allele in the fuzzy peach skin gene?  The fuzzy skin allele is dominant. 

Now onto the cobbler...
1. Preheat oven to 350 degrees.  Cut 4 medium peaches (or nectarines!) into small chunks.  I left the skin on, since it's a shame to remove and toss the valuable nutrients along with the skin.  I measured 3 Cups (~520 g or 18 oz). 

NOTE: when measuring things that are hard to smooth out in a measuring cup, it's better to use a scale and weigh it rather than try to measure a volume.  In this case, a few more pieces of peach is no big deal - but for something like chocolate chips or nuts or something more critical to the finished baked product, mass is a more accurate way to measure.


2. In a large bowl, mix peaches, 1/2 C coconut or cane sugar, 1 tsp cinnamon, 1/8 tsp cardamom, 2 Tbsp arrowroot powder (or cornstarch), and 1.5 Tbsp lemon or lime juice.


3. Pour mixed fruit into pie dish, and smooth out fruit along base of dish with spoon or spatula.


4. Mix 2 cups granola (regular or gluten-free!) with 2 Tbsp melted coconut oil.  Pour oiled granola on top of fruit in pie dish.  Smooth out until fruit completely covered.  Pop into preheated oven for 20 minutes.


5. Let cool 10-20 minutes.  Spoon into dishes and 
garnish with mint or basil leaves.  Enjoy!


Peach Cobbler (Vegan/Gluten-free)
1. Preheat oven to 350 degrees.  Cut 4 medium peaches (or nectarines!) into small chunks.  I left the skin on, since it's a shame to remove and toss the valuable nutrients along with the skin.  I measured 3 Cups (~520 g or 18 oz). 
NOTE: when measuring things that are hard to  smooth out in a measuring cup, it's better to use a scale and weigh it rather than try to measure.  In this case, a few more pieces of peach is no big deal - but for something like chocolate chips or nuts or something more critical to the finished baked product, mass is a more accurate way to measure.

2. In a large bowl, mix peaches, 1/2 C coconut or cane sugar, 1 tsp cinnamon, 1/8 tsp cardamom, 2 Tbsp arrowroot powder (or cornstarch), and 1.5 Tbsp lemon or lime juice.

3. Pour mixed fruit into pie dish, and smooth out fruit along base of dish with spoon or spatula.

4. Mix 2 cups granola (regular or gluten-free!) with 2 Tbsp melted coconut oil.  Pour oiled granola on top of fruit in pie dish.  Smooth out until fruit completely covered.  Pop into preheated oven for 20 minutes.

5. Let cool 10-20 minutes.  Spoon into dishes and garnish with mint or basil leaves.  Enjoy!

Monday, June 17, 2013

How to wash and cook Beet Greens (Sauteed Beet Green recipe)

The top greens of beets are an excellent source of carotenoids, flavonoid antioxidants, and vitamin A.  The greens actually contain these compounds in concentrations several times higher than in the roots.

So - how to deal with these beet greens?  It's easy.  If you're familiar with working with Swiss Chard, it's basically the same.  Here are step-by-step instructions for my Sauteed Beet Greens recipe!


1. Cut the leafy green part, and separate from the red stems.  Then cut the stems into 1" pieces.  Wash stem pieces and set aside.


Beet this!!

Dorky title, I know.  But it's such a glorious time of year at the farmer's markets.  Fresh and delicious EVERYTHING.  Beets are aplenty.  And they're nutritional rock stars.

Most of us are familiar with the deep red variety, and only the root part of the beet.  Some of us are familiar with them coming in cans.  But don't shy away from beets!  They are easier to cook than you might think.  There are also a few different varieties: orange-yellow (often variegated), white and red.  Whatever you do - don't toss those greens!!

Check out the stats on beets (root: cooked/boiled/roasted) - in 1/2 cup, sliced:

  • 37 calories
  • 1.7 g fiber
  • 1.4 g protein
  • Total Omega-3 fatty acids 4.3 mg
  • Total Omega-6 fatty acids 49.3 mg
  • Vitamins A, C, K, Niacin (B3) Vitamin B5 and B6, Folate (17%DV)
  • Calcium, Iron, Magnesium, Phosphorus, Potassium, Sodium, Zinc, Copper, Manganese (14% DV), Selenium


So, how to cook beets?  Easy.  Cut the stems ~1" from the root.  Wash the red root, being careful not to tear the skin.  Then put them in a pot, cover the beets with water so the level is just higher than the beets, then boil with the skin on for 30-40 minutes.  Then dump the water, and when beets are cooled, take a paring knife to take skin off the beet; it comes off very easily.

You can also roast beets - wrap them individually in foil with a bit of canola or olive oil.  Roast at 375 degrees for 45 minutes to 1 hour.  They are ready when a knife easily pierces flesh.  Roasted beets have a wonderful flavor!  Same thing here - when done, wait for them to cool and peel skin.

Now, what do to with those stems?  Be a Savvy Tart, wash them, and eat them as a side dish!  I take a sharp knife, and cut the greens from the stems.  Wash the greens and stems separately. See my step-by-step instructions.  Beet greens are so delicious and have a natural flavor to them, that you almost never even have to salt them!

Click here for my Beet Salad with Oranges & Goat Cheese recipe.  Super, ridiculously yummy.

You really can't beet it!


Beet salad with Oranges & Goat Cheese

There is nothing like a beet salad to impress your guests, or just to eat either as a side, or even as dinner one night.  It is filling!  Here are step-by-step instructions.  As always, the Savvy Tart preps in stages, because we are busy people!

1. First, I boil or roast the beets.  I do this whenever I have time - either in the morning, or day before.  See my post here on instructions for cleaning/cooking the root of the beet.

2. Next, I slice my beets in 1/4" slices.  I peel and slice an orange.

3. Arrange on plate, sprinkle goat cheese (or feta), and top with a nice spicy green such as baby arugula.

4. Lightly salt with sea salt or kosher salt.  Drizzle with olive oil and balsamic vinegar.  If you're feeling bold, you can even add some balsamic glaze (not shown).  Also, since you know I'm obsessed with fennel at the moment, adding a sprinkle of dried fennel (also called anise) seeds, or even freshly (thinly) sliced fennel adds another dimension to this delicious and healthy salad!


Friday, June 14, 2013

Mercury Rising: Reduce Your Consumption in Fish (especially canned tuna)


When you're shopping for tuna, have you been sucked into thinking that Albacore is the only way to go?  You're not really sure of the reason, but it's definitely the can you pick up, because it sounds like the superior choice?

I made that mistake many years ago, until I became informed on the topic.  It's important to be aware of mercury exposure, and admittedly, I'm on the fence.  While I'm currently a Vegan Flirt (assessing what diet is best for me), at this time I believe the benefits of certain fish in my diet outweigh the risks.  Fish is a lean, low-calorie source of protein replete with omega 3 fatty acids and vitamin B12 (as essential vitamin only found in fish, shellfish, meat, dairy and eggs).  But some varieties of fish do cause me concern, and for good reason...


How does mercury get into our food?  
Mercury is a naturally occurring element in the environment.  It can also be released into the air through industrial pollution.  Mercury falls from the air and into lakes, streams and oceans, whereby it converts to methylmercury.  It is this form of mercury that can be harmful to unborn babies and young children.  Fish absorb environmental methylmercury as they feed, and thus it accumulates in their tissues.  However, this accumulation varies - some types of fish and shellfish are more susceptible depending on what they prey on, and the levels of methylmercury is variable in different environments.  

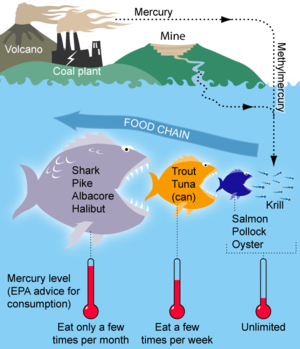
In general, larger species of fish (such as shark) that are long-lived and prey on larger varieties of fish tend to accumulate more mercury in their tissues, since they are on the top end of the food chain.  Shrimp are on the bottom of the food chain - they are smaller and feed on phytoplankton and zooplankton, and accumulate less methylmercury than their larger predators.  The figure below illustrates this point beautifully.


The most common way people in the US are exposed to mercury is by eating fish containing methylmercury.  Some fish may contain methylmercury at levels that may be a cause of concern.  Note that most people's blood mercury level is below the level associated with possible health effects (<5.8 µg/L of whole blood), and that considerations around mercury intake primarily affect the following groups:

  • women who might become pregnant
  • women who are pregnant
  • nursing mothers
  • young children


So - How to choose fish and canned tuna?
Avoid:

  • canned Albacore (also called white tuna in the US and Canada)
    • Albacore is a large variety of tuna and tends to accumulate higher levels of mercury than other tuna varieties
    • Beware of "chunk white" or "solid white" labels
  • Shark, Swordfish, King Mackerel, Tilefish, Marlin, Bluefin tuna
    • these are all large species of fish at the top of the food chain
Instead choose:

  • canned Light Tuna
    • most people mistake the "light" to mean "less caloric", "less dense", "less fatty", etc.  Light Tuna is primarily composed of a smaller species of tuna called Skipjack, but can include others such as Bigeye, Yellowfin, and Tongol, in “any combination".  These varieties are lower in mercury levels than Albacore and Bluefun as they are smaller and accumulate less mercury.  However, Yellowfin has come under fire as sometimes having higher levels of methylmercury than Skipjack - and there are no regulations on combination ratios.
  • shrimp, pollock, salmon, catfish, oysters, trout, anchovies, tilapia, haddock, lobster, crab, hake, butterfish
**the values noted in this table may not be entirely accurate (it is Wikipedia after all, which I do not consider a trusted source of information).  However, I included it as the trends of mercury levels across species of fish is valuable and nicely displayed as a continuum from highest to lowest levels.


What's the take-away?
MercuryFoodChain-01.png

  1. If concerned about mercury levels, do not eat Shark, Swordfish, Pike, King Mackerel, Marlin, Tilefish.
  2. Eat no more than 12 ounces (two average meals) a week of a variety of fish and shellfish that are lower in mercury.
  3. You can consider eating up to 6 ounces of Albacore tuna per week.
  4. Your body will excrete methylmercury, but the clearance is slow, with overall half-life (i.e. the time to excrete half of ingested amount) at 70-80 days.  This varies by tissue (and the numbers are sobering).  The body is exceptionally efficient at excreting mercury in lactating females.
  5. I watched a documentary once about the canned tuna industry in the US - they catch the tuna, gut and often cook it right on board (often twice) to rid the tuna of its "fishy" flavor and smell.  However, in this process, the omega 3's are removed and dumped into the ocean as the fish is cooked en route to land.  So if you're looking for some omega 3, the Pacific Northwest has a bunch floating around in it!  Also note that because of this process, canned tuna has variable amounts of omega 3, which is not consistent from can to can.  
  6. Check local advisories about the safety of fish caught by family and friends in your local lakes, rivers, and coastal areas.  If no advice is available, eat up to 6 ounces (one average meal) per week of fish you catch from local waters, but don't consume any other fish during that week.


Click here for EPA guidelines on mercury exposure.

Please see:
EPA-FDA Joint Federal Advisory for Mercury in Fish: “What You Need to Know About Mercury in Fish and Shellfish”: 

Tuesday, June 11, 2013

Favorites: Lulu for the Run

I am Canadian (yeah!!) and should have invested in Lululemon either prior to, or soon after, it's IPO (shame on me!)  Perhaps I could make a case to Lulu by showing them my workout wear drawers - there *may* be several dedicated drawers to apparel suited to various activities - I have mucho dineros invested in Lulu.  Here are my current favs that I can stand behind from both functional and aesthetic perspectives, as I own both pieces:

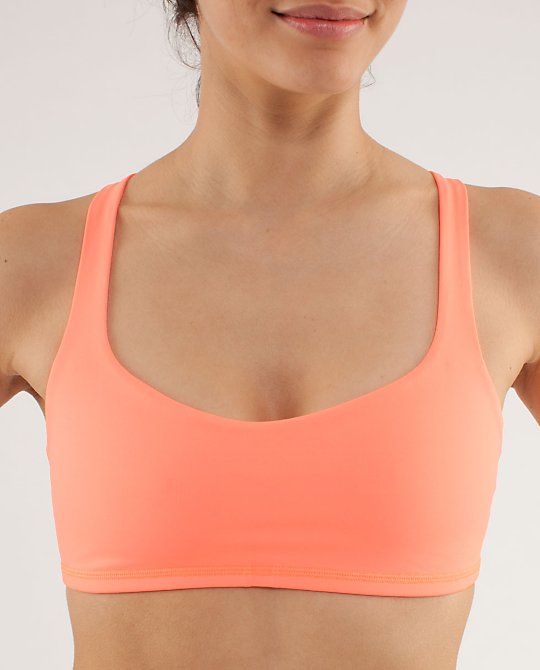
Free To Be Bra
Ahhh..the Free to Be Bra.  I <heart> this bra in a big way.  And as my Ironman body returns to me (yay!) and the temps rise, I'll be rockin this with nothing but a pair shorts and shoes.  Check out the cute strap detail in the back.  Comes with removable pads.  I have two of these and I want more, I want more! (anyone see the AT&T commercial with the little girl?  I want it that much.) http://

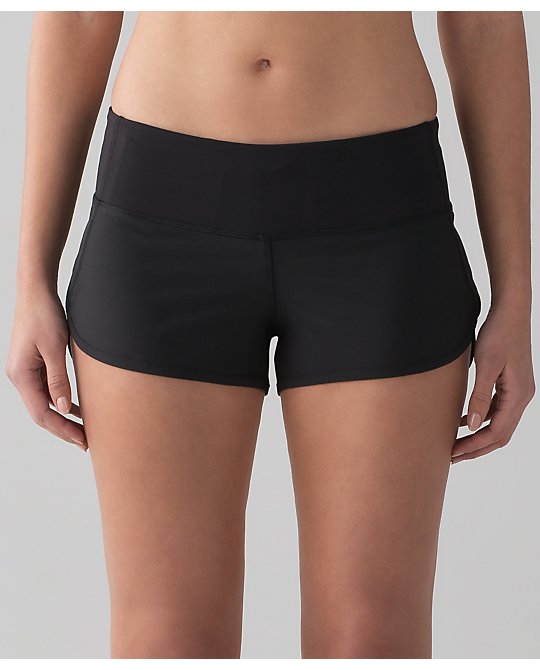
Run:Speed Short*SE
The Run: Speed Short is a fantastic short.  Lulu failed with their "bonded" version - but the regular version is amazing.  I want one in every color - right now I only have one pair in black (as shown) but they are by far my favorite shorts, and have been for a couple years.  They still look brand new.  They were the obvious choice for the LA Marathon - they feature band slots for energy gels, and a back zippered pocket.  Lulu nailed this one.  Perfection. http://

A few looks I'm digging (Piperlime)

I discovered Piperlime on a recent trip to New York City with my dear friend Anat.  I could have spent more time (and money!) at their store on Wooster St, but I had a plane to catch.  Perhaps that was a blessing in disguise.  I've resorted to online shopping (more like wish-making via my laptop screen).  These just came through.  Love.


http://piprl.me/11ELOxP

Saturday, June 8, 2013

Easy Strawberry Granola Tart (Super low-calorie/Gluten-free/Vegan)

This is a glorious time of year for fruit and dessert lovers!  I take full advantage of all the wonderful, fresh fruit summer has to offer.  Chocolate can wait until fall.  The time is now!

I made this wonderful, super low-calorie dessert and it was gobbled up in a couple days.  I used organic strawberries from the Torrance Farmer's market (they were in my fridge and a couple days too old to eat fresh, so I decided to bake them up).  What came out was perfection!

Oh, and you only need about 10 minutes to make this.  Yippee!

Ingredients
Photo: Easy Strawberry Granola Tart3 cups fresh strawberries, chopped and drained
juice of half a lime or lemon (~1/8 cup = 3 Tbsp) - I used lime
1/2 cup vegan cane sugar
1 tsp cinnamon
1/8 tsp cardamom
2 Tbsp arrowroot powder (or cornstarch)

Topping
2 cups granola (use gluten-free granola if desired)
2 Tbsp coconut oil


Directions
1. Preheat oven to 350F.
2. In a large bowl, toss strawberries with sugar, lime/lemon, cinnamon, cardamom and arrowroot.
3. Spread berry mixture into a pie dish.
4. In a small bowl, combine granola with coconut oil.  Spread across berry mixture and bake 20 minutes, or until tart bubbles and topping turns golden.
5. Let cool a few minutes, then enjoy!  Store on countertop for 3-4 days, or in fridge for longevity.


**Get creative and take advantage of the bounty of local fresh, sweet summer fruit from your local farmer's market.  I'm making this again tomorrow - this time with fresh, organic peaches and nectarines!  
**Please note that if you're counting calories, berries and peaches are wonderful low calorie fruits.  Try blackberries, raspberries, peaches, or mix them all together!  

1 cup raw raspberries = 64 calories
1 cup raw blackberries = 62 calories
1 cup peach slices (raw) = 64 calories
1 cup raw strawberries (halves) = 49 calories
1 cup raw strawberries (sliced) = 53 calories

Thursday, June 6, 2013

Mango Cutting 101


Hi Tartlets!  It's Ataulfo mango season, which is my favorite kind of mango.  They are less stringy and more reliably sweet during peak season (March-July) than their Tommy Atkins (red/green) counterparts.  They also have a high flesh-to-seed ratio (seeds are small!)  I could eat them all day long, if they weren't so caloric...*sigh*.


(Eat mangoes in moderation if you're counting calories! You're looking at ~100-135 cals/fruit (without refuse). )

So - this morning I was making mango jam before work (we'll talk about jam later).  It took me many years of eating mangoes before I learned to cut them well.  My technique:

(1) Lay mango on its side.  Take a sharp knife, guess where the pit might be, and start slicing as close to the top of the pit as possible.  You might hit the pit, in which case, move you knife up a bit and try again.  The goal is to cut all along the length of the mango, as close to the pit as possible.  Flip mango, and repeat on bottom.


(2) What results is this:
The fruit with pit inside is on the top of the photo below; the bottom two are the large pit-free slices I took off the top and bottom of the mango, as I followed along the length of the pit.  Then, I sliced the flesh with the knife, creating "fingers".  I took the spoon you see and scooped out the fingers.  You can see all that is left is only the skin.  Repeat for both sides.


(3) Now try and get some bits off the portion that contains the pit.  I take my knife and first cut the skin that remains around the perimeter of the pit.  I cut very close to the skin, taking care not to lose too much mango in the process (you can use a potato/vegetable peeler if you prefer).  I only want to remove the skin.  Then, I cut around the pit on all sides and slice off mango flesh wherever I can find it.  All that should be left in the end is a pit.

Or...if you're feeling lazy, you can do what I sometimes do - just knaw at the pit and eat whatever you can get!  Then floss your teeth.

**Enjoy**